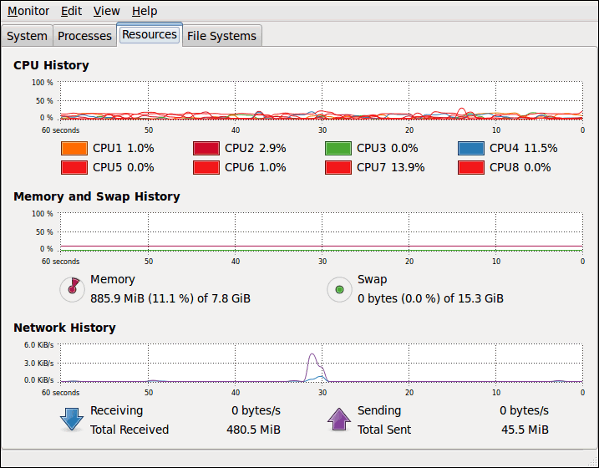
Cisco Router Basics:
Cisco is well known for its routers and switches. I must admit they are very good quality products and once they are up and running, you can pretty much forget about them because they rarely fail.
We are going to focus on routers here since that's the reason you clicked on this page !
Cisco has a number of different routers, amongst them are the popular 880 series, 2900 series and 3900 series.
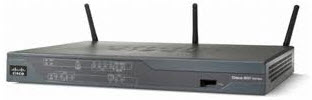
Below are a pictures few of the routers mentioned (880 & 2900 series):
Cisco is well known for its routers and switches. I must admit they are very good quality products and once they are up and running, you can pretty much forget about them because they rarely fail.
We are going to focus on routers here since that's the reason you clicked on this page !
Cisco has a number of different routers, amongst them are the popular 880 series, 2900 series and 3900 series.
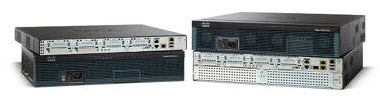
Below are a pictures few of the routers mentioned (880 & 2900 series):
All the above equipment runs special software called the Cisco Internetwork Operating System or IOS. This is the kernel of Cisco routers and most switches. Cisco has created what they call Cisco Fusion, which is supposed to make all Cisco devices run the same operating system.
We are going to begin with the basic components which make up a Cisco router (and switches) and I will be explaining what they are used for, so grab that tea or coffee and let's get going !
The basic components of any Cisco router are :
1) Interfaces
2) The Processor (CPU)
3) Internetwork Operating System (IOS)
4) RXBoot Image
5) RAM
6) NVRAM
7) ROM
8) Flash memory
9) Configuration Register
Now I just hope you haven't looked at the list and thought "Stuff this, it looks hard and complicated" because I assure you, it's less painful than you might think ! In fact, once you read it a couple of times, you will find all of it easy to remember and understand.
Interfaces
These allow us to use the router ! The interfaces are the various serial ports or ethernet ports which we use to connect the router to our LAN. There are a number of different interfaces but we are going to hit the basic stuff only.
Here are some of the names Cisco has given some of the interfaces: E0 (first Ethernet interface), E1 (second Ethernet interface). S0 (first Serial interface), S1 (second Serial interface), BRI 0 (first B channel for Basic ISDN) and BRI 1 (second B channel for Basic ISDN).
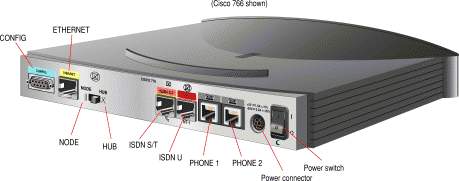
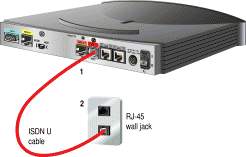
In the picture below you can see the back view of a Cisco router, you can clearly see the various interfaces it has:(we are only looking at ISDN routers)
You can see that it even has phone sockets ! Yes, that's normal since you have to connect a digital phone to an ISDN line and since this is an ISDN router, it has this option with the router. I should, however, explain that you don't normally get routers with ISDN S/T andISDN U interfaces together. Any ISDN line requires a Network Terminator (NT) installed at the customer's premises and you connect your equipment after this terminator. An ISDN S/T interface doesn't have the NT device built in, so you need an NT device in order to use the router. On the other hand, an ISDN U interface has the NT device built in to the router.
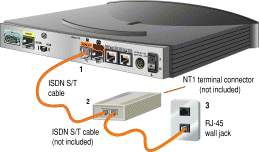
Check the picture below to see how to connect the router using the different ISDN interfaces:
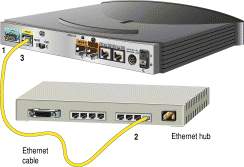
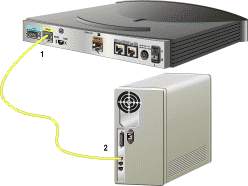
Apart from the ISDN interfaces, we also have an Ethernet interface that connects to a device in your LAN, usually a hub or a computer. If connecting to a Hub uplink port, then you set the small switch to "Hub", but if connecting to a PC, you need to set it to "Node". This switch will simply convert the cable from a straight through (hub) to a x-over (Node):
The Config or Console port is a Female DB9 connector which you connect, using a special cable, to your computers serial port and it allows you to directly configure the router.
The Processor (CPU)
All Cisco routers have a main processor that takes care of the main functions of the router. The CPU generates interrupts (IRQ) in order to communicate with the other electronic components in the router. The Cisco routers utilise Motorola RISC processors. Usually the CPU utilisation on a normal router wouldn't exceed 20 %.
The IOS
The IOS is the main operating system on which the router runs. The IOS is loaded upon the router's bootup. It usually is around 2 to 5MB in size, but can be a lot larger depending on the router series. The IOS is currently on version 12, and Cisco periodically releases minor versions every couple of months e.g 12.1 , 12.3 etc. to fix small bugs and also add extra functionality.
The IOS gives the router its various capabilities and can also be updated or downloaded from the router for backup purposes. On the 1600 series and above, you get the IOS on a PCMCIA Flash card. This Flash card then plugs into a slot located at the back of the router and the router loads the IOS "image" (as they call it). Usually this image of the operating system is compressed so the router must decompress the image in its memory in order to use it.
The IOS is one of the most critical parts of the router, without it the router is pretty much useless. Just keep in mind that it is not necessary to have a flash card (as described above with the 1600 series router) in order to load the IOS. You can actually configure most Cisco routers to load the image off a network tftp server or from another router which might hold multiple IOS images for different routers, in which case it will have a large capacity Flash card to store these images.
The RXBoot Image
The RXBoot image (also known as Bootloader) is nothing more than a "cut-down" version of the IOS located in the router's ROM (Read Only Memory). If you had no Flash card to load the IOS from, you can configure the router to load the RXBoot image, which would give you the ability to perform minor maintenance operations and bring various interfaces up or down.
The RAM
The RAM, or Random Access Memory, is where the router loads the IOS and the configuration file. It works exactly the same way as your computer's memory, where the operating system loads along with all the various programs. The amount of RAM your router needs is subject to the size of the IOS image and configuration file you have. To give you an indication of the amounts of RAM we are talking about, in most cases, smaller routers (up to the 1600 series) are happy with 12 to 16 MB while the bigger routers with larger IOSimages would need around 32 to 64 MB of memory. Routing tables are also stored in the system's RAM so if you have large and complex routing tables, you will obviously need more RAM !
When I tried to upgrade the RAM on a Cisco 1600 router, I unscrewed the case and opened it and was amazed to find a 72 pin SIMM slot where you needed to attach the extra RAM. For those who don't know what a 72 pin SIMM is, it's basically the type of RAM the older Pentium socket 7 CPUs took, back in '95. This type of memory was replaced by today's standard 168 pin DIMMs or SDRAM.
The NVRAM (Non-Volatile RAM)
The NVRAM is a special memory place where the router holds its configuration. When you configure a router and then save the configuration, it is stored in the NVRAM. This memory is not big at all when compared with the system's RAM. On a Cisco 1600 series, it is only 8 KB while on bigger routers, like the 2600 series, it is 32 KB. Normally, when a router starts up, after it loads the IOS image it will look into the NVRAM and load the configuration file in order to configure the router. The NVRAM is not erased when the router is reloaded or even switched off.
ROM (Read Only Memory)
The ROM is used to start and maintain the router. It contains some code, like the Bootstrap and POST, which helps the router do some basic tests and bootup when it's powered on or reloaded. You cannot alter any of the code in this memory as it has been set from the factory and is Read Only.
Flash Memory
The Flash memory is that card I spoke about in the IOS section. All it is, is an EEPROM (Electrical Eraseable Programmable Read Only Memory) card. It fits into a special slot normally located at the back of the router and contains nothing more than the IOS image(s). You can write to it or delete its contents from the router's console. Usually it comes in sizes of 4MB for the smaller routers (1600 series) and goes up from there depending on the router model.
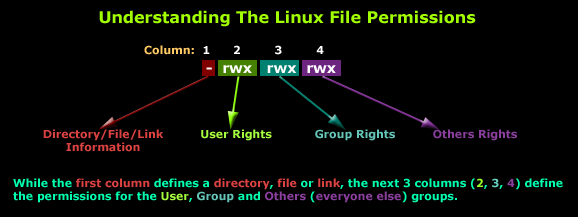
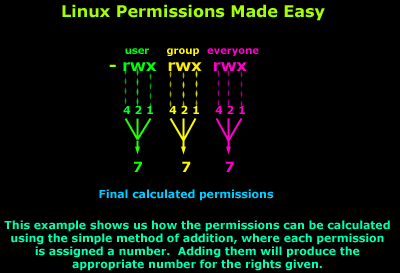
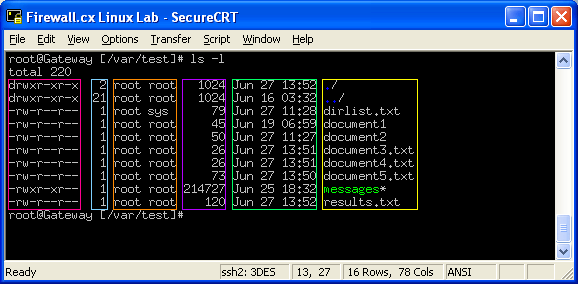
Configuration Register
Keeping things simple, the Configuration Register determines if the router is going to boot the IOS image from its Flash, tftp server or just load the RXBoot image. This register is a 16 Bit register, in other words has 16 zeros or ones. A sample of it in Hex would be the following: 0x2102 and in binary is : 0010 0001 0000 0010.