Configure linux printer server step by step guide example and implementation:
Linux uses the Common UNIX Printing System, also known as CUPS. CUPS uses the Internet Printing Protocol (IPP) to allow local printing and print sharing. The /etc/cups/
directory stores all the configuration files for printing. However,
these files can be easily managed with the Printer Configuration Tool in
Linux.
Exam question
Raw (Model) printer named printer1 is
installed and shared on 192.168.0.254. You should install the shared
printer on your PC to connect shared printer using IPP Protocols.
Exam question
Raw printer named printerx where x is
your station number is installed and shared on server1.example.com.
Install the shared printer on your PC to connect shared printer using
IPP Protocols. Your server is 192.168.0.254.
Before you can use any printer, you first have to install it on a
Linux system on your network.
To start the Printer Configuration Tool,
go to the System menu on the top panel and select Administration, Printing or execute the command:
#system-config-printer.

If no printers are available for the system, only the Server Settings view is available for selection. If local printers are configured, a Local Printers menu will available.
Install new printer:
click New Printer on the toolbar.

In the dialog window that appears, accept the default queue name or change it to a short, descriptive name that begins with a letter and does not contain spaces. Then select printer from list and click on forward and click on finsh.
spool directories
When your system prints a file, it makes use of special directories called spool directories.
The location of the spool directory is obtained from the printer's
entry in its configuration file. On Linux, the spool directory is
located at /var/spool/cups under a directory with the name of the printer.
print job
A print job is a file to be printed.
When you send a file to a printer, a copy of it is made and placed in a
spool directory set up for that printer.
classes
CUPS features a way to let you select a
group of printers to print a job instead of selecting just one. That
way, if one printer is busy or down, another printer can be
automatically selected to perform the job. Such groupings of printers
are called classes. Once you have installed your printers, you can group them into different classes.
Once you have successfully installed local printer it will show in right pane. and in left pane you can see all administrative options.

- To view shared printer on other system Tick mark on first option
- To share locally attached printer tick mark on second option
- To allow remote administration of this printer check mark on third option
Tick mark on appropriate option and click on apply

configure window clients:
Go on window system and ping from printer server and open internet explorer and give the ip address of server with printer port 631

This will launch CUPS web application click on manage printer

now you will see the shared printer on server click on print test page

A test page will be send on printer server copy this url of printer

click on start button select printer and fax and click on add new printer. this will launch add new printer wizard click next on welcome screen and select network printer

On this screen select internet printer and paste the url which you copied from internet explorer

Install appropriate driver from list or use have disk option you have drive cd and click next. On next screen set this printer defaults and click on next and finish.

Remote administration of print server:
Go on linux system and ping from server and click on printing from administration menu
Now click on go to server

Now give print server ip address

It will take few minute to connect from server depending on network speed

Now give root password to connect printer server

you can see all print administrative Manu in right pane Once you have connected with sever

configure Linux clients:
Go on linux system and ping from server and click on printing from administration menu
Now click on new printer
Click on forward In the next New Printer screen, select the type of connection to internet printing protocols and in hostname give server ip and printer name in printername

select the appropriate model. If multiple drivers are available, select
the one most appropriate for your configuration. If you do not want to
choose the default and click forward and finish. The main Printer Configuration window should now include the name of your printer.

To print test page click on print test page and a test page will send to print server

Managing Printers from the Command-Line:
The lpadmin command enables you to perform most printer administration tasks from the command-line.

 lpc To view all known queues
 lpr To send print requests to any local print queue
 lpq To see the print queue
lprm To delete the jobs of your choice use it with the job number
lp To print any file.

###############################################
CUPS printer sharing:
1.Manual setup
simply open up /etc/cups/cupsd.conf and allow access to the server by modifying the location lines.
#vim /etc/cups/cupsd.conf
<Location />
   Order allow,deny
   Allow localhost
   Allow 192.168.0.*
</Location>
Also make sure the server is listening on the IP address the client will
be addressing. Add the following line after "# Listen
<serverip>:631" (using the server's IP address instead of client's
be addressing. Add the following line after "# Listen
<serverip>:631" (using the server's IP address instead of client's
192.168.0.100):
Listen 192.168.0.101:631
To "Show shared printers on the local network", add the line "BrowseAllow all":Browsing On BrowseOrder allow,deny BrowseAllow @LOCAL BrowseAllow all After making modifications, restart CUPS by:
# /etc/rc.d/cupsd restart
On the client system, open up (create if not present)
/etc/cups/client.conf and add the ServerName to match the IP address or the name of the server. Add this line:To "Show shared printers on the local network", add the line
"BrowseAllow all":
Browsing On
BrowseOrder allow,
deny
BrowseAllow @LOCAL
BrowseAllow all
There are more configuration possibilities, including automatic methods, which are described in detail in http://localhost:631/help/network.html
After making modifications, restart CUPS.
Case1: Linux server - Windows client:
1.Sharing via IPP:
The preferred way to connect a Windows client to a Linux print server is using IPP. It's a standard printer protocol based on HTTP, allowing you all ways to profit from port forwarding,
On the Windows computer, go to the printer control panel and choose to 'Add a New Printer'. Next, choose to give a URL. For the URL, type in the location of the printer: http://host_ip_address:631/printers/printer_name (where host_ip_address is the GNU/Linux server's IP address and printer_name is the name of the printer being connected to).
After this, install the native printer drivers for your printer on the Windows computer. If the CUPS server is set up to use its own printer drivers, then you can just select a generic postscript printer for the Windows client(e.g. 'HP Color LaserJet 8500 PS' or 'Xerox DocuTech 135 PS2'). Then test the print setup by printing a test page.
2.Sharing via Samba:
This makes this way more difficult to configure and thus sometimes also more error-prone, mostly due do authentication problems.
To configure Samba on the Linux server, edit/etc/samba/smb.conf file to allow access to printers. File smb.conf can look something like this:#vim /etc/samba/smb.conf
[global]
workgroup=Heroes
server string=Arch Linux Print Server
security=user

[printers]
    comment=All Printers
    path=/var/spool/samba
    browseable=yes
    # to allow user 'guest account' to print.
    guest ok=no
    writable=no
    printable=yes
    create mode=0700
    write list=@adm root yourusername
 That should be enough to share the printer, yet adding an individual printer entry may be desirable:

/etc/samba/smb.conf
[ML1250]
    comment=Samsung ML-1250 Laser Printer
    printer=ml1250
    path=/var/spool/samba
    printing=cups
    printable=yes
    printer admin=@admin root yourusername
    user client driver=yes
    # to allow user 'guest account' to print.
    guest ok=no
    writable=no
    write list=@adm root yourusername
    valid users=@adm root yourusername
Please note that this assumes configuration was made so that users
must have a valid account to access the printer. To have a public
printer, set guest ok to yes, and remove the valid users line. To add accounts, set up a regular GNU/Linux account and then set up a Samba password on the server. For instance:# useradd yourusername
# smbpasswd -a yourusername
After this, restart Samba daemon:
# /etc/rc.d/samba restart
Case2: Windows server - Linux client
Sharing via LPD
Windows 7 has a built-in LPD server - using it will probably be the easiest approach as it does neither require an installation of Samba on the client nor heavy configuration on the server. It can be activated in the Control Panel under Programs -> Activate Windows functions in the section Print services. The printer must have shared activated in its properties. Use a share name without any special characters like spaces, commas, etc.Then the printer can be added in CUPS, choosing LPD protocol. The printer address will look like this:
# lpd://windowspc/printersharenameBefore adding the printer, you will most likely have to install an appropriate printer driver depending on your printer model. Generic PostScript or RAW drivers might also work.
Sharing via IPP
As above, IPP is also the preferred protocol for printer sharing. However this way might be a bit more difficult than the native Samba approach below, since you need a greater effort to set up an IPP-Server on Windows. The commonly chosen server software is Microsoft's Internet Information Services (IIS).Sharing via Samba
A much simpler way is using Window's native printer sharing via Samba. There is almost no configuration needed, and all of it can be done from the CUPS Backend. As above noted, if there are any problems the reason is mostly related to authentication trouble and Windows access restrictions.On the server side enable sharing for your desired printer and ensure that the user on the client machine has the right to access the printer.
The following section describes how to set up the client, assuming that both daemons (cupsd and smbd) are running.
Configuration using the web interface
The Samba CUPS back-end is enabled by default, if for any reason it is not activate it by entering the following command and restarting CUPS.# ln -s $(which smbspool) /usr/lib/cups/backend/smbNext, simply log in on the CUPS web interface and choose to add a new printer. As a device choose "Windows Printer via SAMBA".
For the device location, enter:
smb://username:password@hostname/printer_nameOr without a password:
smb://username@hostname/printer_nameMake sure that the user actually has access to the printer on the Windows computer and select the appropriate drivers. If the computer is located on a domain, make sure the user-name includes the domain:
smb://username:password@domain/hostname/printer_nameIf the network contains many printers you might want to set a preferred printer. To do so use the web interface, go into the printer tab, choose the desired printer and select 'Set as default' from the drop-down list.
Manual configuration
For manual configuration stop the CUPS daemon and add your printer to/etc/cups/printers.conf, which might for example look like this
/etc/cups/printers.conf
<DefaultPrinter MyPrinter>
AuthInfoRequired username,password
Info My printer via SAMBA
Location In my Office
MakeModel Samsung ML-1250 - CUPS+Gutenprint v5.2.7        # <= use 'lpinfo -m' to list available models
DeviceURI smb://username:password@hostname/printer_name   # <= server URI as described in previous section
State Idle
Type 4
Accepting Yes
Shared No
JobSheets none none
QuotaPeriod 0
PageLimit 0
KLimit 0
AllowUser yourusername                                    # <= do not forget to change this
OpPolicy default
ErrorPolicy stop-printer
</Printer>
Then restart the CUPS daemon an try to print a test page.
To set the preferred printer use the following command
# lpoptions -d desired_default_printer_name
Troubleshooting
If there are any problems, the first thing to do is enable debug information by settingLogLevel debugin
/etc/cups/cupsd.conf.
Then restart the CUPS daemon and check for error messages in /var/log/cups/error_log. A convenient way to do so is
# tail -f /var/log/cups/error_logwhich keeps printing new error messages as the occur.
Note: You can also use the web interface to browse this error file.
###############################################
How to share a local printer on Linux with Windows using Samba:
Samba is an Open Source/Free Software suite that provides seamless file and print services to SMB/CIFS clients.
1. Install samba - Use yum to install samba for your Fedora release.$ sudo yum install samba2. Configure samba - Edit following section in your smb.conf file. (Here is my complete smb.conf file.)
$ sudo vi /etc/samba/smb.conf

[global]
   workgroup = WORKGROUP
   security = share

[printers]
# Share Printer (2005-01-02 by Thomas Chung)
   printing = cups
   public = yes
   printer name = epson
   use client driver = yes
$ sudo /sbin/chkconfig smb on
$ sudo /sbin/service smb restart
3. Configure iptables - Add following rules to your iptables to accept NETBIOS session service from Windows.
$ sudo vi /etc/sysconfig/iptables

-A RH-Firewall-1-INPUT -m state --state NEW -m tcp -p tcp --dport 139 -j ACCEPT
-A RH-Firewall-1-INPUT -m state --state NEW -m udp -p udp --dport 139 -j ACCEPT
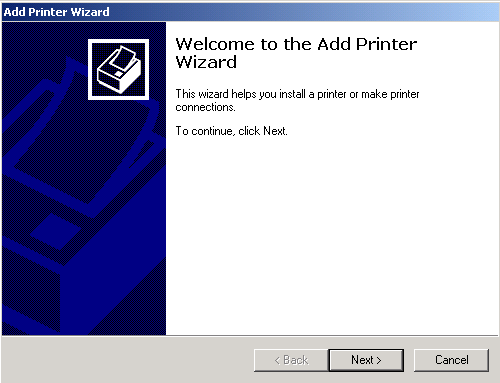
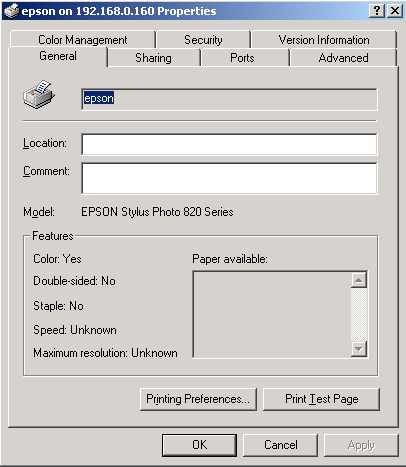
$ sudo /sbin/service iptables restart4. Add printer from Windows. (Following screenshots were taken from Windows 2000)
1) Choose Start > Settings > Printers
2) Choose Network printer
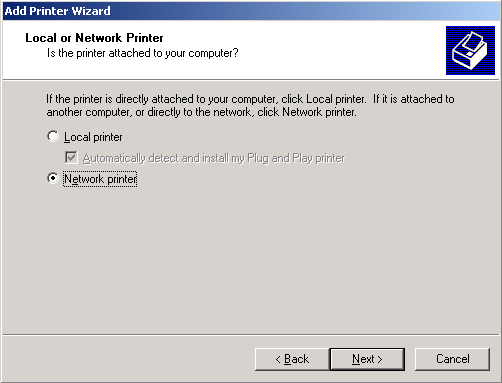
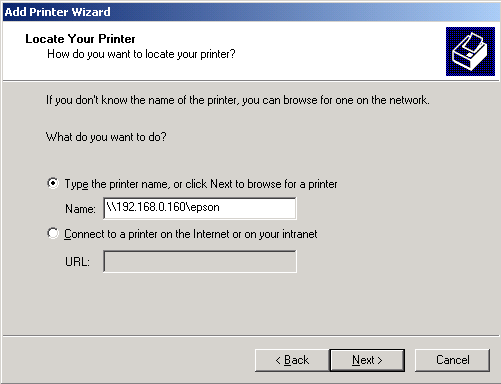
3) Type printer name as following. Make sure to substitute with your Linux IP address and Samba printer name.
4) You will see following message since there is no Windows printer driver on Linux. Click OK.

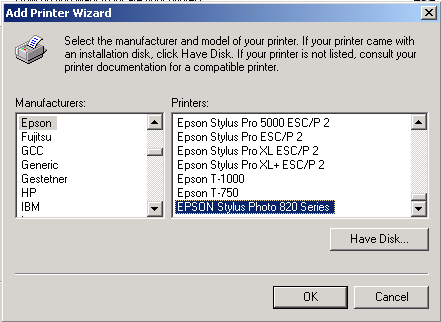
5) Select your model of your printer from following. You might need to install a printer driver from a CD came with the printer.
6) You've added printer driver successfully.
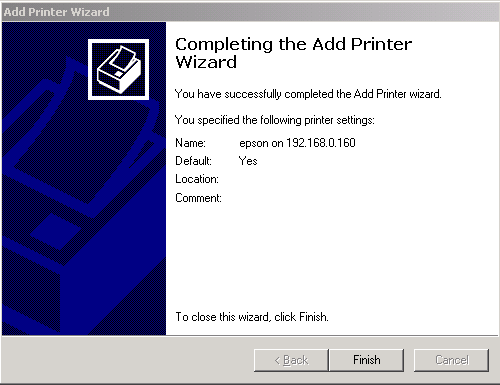
7) Now, print a test page from Windows to the printer which is attached to Linux box.
###############################
Questions
How can I set up my printer from within Linux to be accessible from my Windows 7 pc?
Step 1: Enable Sharing for that Printer.
Menu > Administration > Printing > Right Click the attached printer > Properties > Policies
Check Enabled, Accepting Jobs, and Shared
Step 2: Enable Publishing of the Shared Printer
Menu > Administration > Printing > Server > Settings > Check "Publish Shared Printers connected to this system"
Step 3: Allow guest access to printer
Edit smb.conf as root:
#gedit /etc/samba/smb.conf
Change the "guest ok" line from no to yes in the [printers] special share:
[printers]
comment = All Printers
browseable = No
path = /var/spool/samba
printable = yes
guest ok = yes
read only = yes
create mask = 0700
Step 4: Restart these services in this exact order:
fantastic job on writing this…
ReplyDeleteWorld Wide Business Directories of Manufacturers Exporters &Suppliers
The Linux Stuff: Configure Linux Printer Server Step By Step Guide And Printer Sharing Configuration. >>>>> Download Now
Delete>>>>> Download Full
The Linux Stuff: Configure Linux Printer Server Step By Step Guide And Printer Sharing Configuration. >>>>> Download LINK
>>>>> Download Now
The Linux Stuff: Configure Linux Printer Server Step By Step Guide And Printer Sharing Configuration. >>>>> Download Full
>>>>> Download LINK RF
Nice blog & thanks for sharing this useful information with us. We offer 24*7 printer support services to the customers across the world. Our expert team provides assistance for wireless printer setup, so if you are facing setup issues you can call us at our toll free number +1-888-339-8933 .
ReplyDeleteThanks for the useful blog. Keep updating.
ReplyDeleteLinux online Training
Linux online course
Linux Online Training in Hyderabad
Linux Online Training in Bangalore
Linux Online Training in Chennai
High DA Free Bookmarking Site List For 2019
ReplyDeleteFree Blog Creation Site List 2019
High DA Free Web.2.0 Site List For 2019
High DA Free Classified Site List For 2019
High DA Free Directory Submission Site List 2019
High DA Free Article Submission Sites List 2019
High DA , PA Do Follow Free Forum Site List 2019
Thanks for sharing this awesome tips with us.Printing services in Hyderabad
ReplyDeleteI hope this is very helpful to know.Thank you
offset printing services in hyderabad
multi color printing
ReplyDeleteThanks for sharing information. Choosing computer accessories from leading IT store offer great discount and value for your money Computer Store Australia | Buy Printers Online
Pretty good post. I just stumbled upon your blog and wanted to say that I have really enjoyed reading your blog posts. Any way I'll be subscribing to your feed and I hope you post again soon. Big thanks for the useful info. 3d printer supplies near me
ReplyDeleteA very awesome blog post. We are really grateful for your blog post. You will find a lot of approaches after visiting your post. design a sticker
ReplyDelete